Before you start this step-by-step guide, sign up for a free account by clicking Sign Up at the top of the page. During the sign up process, check the box that says "I work as a teacher."
After your account is created, follow the guided prompts to get started.
Step 1: Plan Your Lesson
Click the button below to discover lesson plans and great writing projects!
Find Writing Projects & Lesson PlansTo see examples of how leading educators have used StoryJumper with their students, take a look at the StoryJumper Leading Educators page.
Many types of StoryJumper books can be created, such as:
- All About Me Book. Great way for students (and teachers!) to introduce themselves to each other. See our All About Me Lesson Plan.
- Reflective Journal. Students reflect and write about what they did and learned after an important experience or after completing a school project / field trip. See our Reflective Journal Lesson Plan.
- Diary. To develop empathy, create a diary from the perspective of a historical character or animal.
- Teach a Topic. Write a book to teach a topic, demonstrating mastery of the subject matter.
- ABC's of _______ Book. Cover the basics of any topic in 26 pages, A-Z. Click "Create a Book" and choose this template.
- Narrative Writing. You can customize our Narrative Writing Lesson Plan or StoryStarter Guide.
- Group Book. Each student contributes one or two pages to a group book on poetry, field trip, or other topic.
When you're ready you can create a book using a computer or iPad.
Step 2: Create a Book
Now it's time for you to create a book so you can experience the joy of creating StoryJumper books! There are 3 ways to express yourself using our creation tools:
- Text. Choose your font, textbox style, colors, and other formatting options.
- Pictures. Design your own characters who look like you, your friends, and family. Upload your own photos or use our artwork of props and scenes.
- Sound. Add your voice, background music, and sound effects.
Individual Books
You can create your own individual StoryJumper book and share it with your students to get them excited about creating their own book. Watch the video below to learn the basics of how to create a StoryJumper book.
Template Books
To help students get started more quickly on their books, you can create a template book that they can duplicate and customize.
Here's how:
- On your "Home" page, click on your class, and click the "Books" tab.
- Click "+ Create Book" and choose "Template Book".
- Pick a blank template or one of the provided templates
- After the editor opens, add text/props/scenes to various pages to indicate the structure of the book.
- If you want, add photos and make them props/scenes that students can quickly use.
- When you're done, click "Save & Exit" at the top.
- Click "Share" next to your template book
- Click which classes should see this template book.
- Click "YES" next to "Template Book?".
- Finally, when students in those classes log in and click "Create Book", they will see your template book. After they click it, they will get their own online copy of it that they can customize. Their books will be private, by default.
Group Books
As a teacher, you can create a "Group Book" where each student contributes certain pages in a collaborative book. You can enter each student's name on the pages they are assigned to, so they'll know which pages to focus on.
Here's how:
- Each student must have an account before you get started. On your "Home" page, click on your class, and click the "People" tab to ensure everyone's first and last names have been entered. You'll see why below.
- On your class page, click the "Books" tab.
- Click "+ Create Book" and choose "Group Book".
- After the editor opens, type the name of each student you want to add to the group book. Only students listed in your "People" tab will appear as options.
- Add the book's title on the front cover.
- Each student will see the group book on their home page when they log out. They just click on the book, click "Edit", and go to the pages that they're assigned to.
- If you want to add more students to the group book later, "Edit" the book and click "Collaborate" at the top.
If there's a question about whether a specific student is making changes to the right pages, you can click "Collaborate" in the editor, click on the student's name, and see which pages they've modified.
Compilation Books
As a teacher, you can create a "Compilation Book" where you can combine multiple books from your StoryJumper class into a single compilation book.
This approach works well if you want students to work independently (not collaboratively) and you combine their work into one book when they're done.
For example, you could create a compilation book for:
- Class Yearbook, where each student creates their own page(s) independently and then you combine their completed page(s) into the class yearbook
- Poetry Book, where each student writes their own poem independently and then you compile everyone's poems into one big poetry book
- Short Story Anthology, where you compile all of the students' stories into one big anthology of stories
Compilation books are a great way to showcase everyone's work in one book that is easy to share and purchase. At this time, there's a limit of 200 pages per compilation book.
Here's how:
- On your "Home" page, click on your class, and click the "Books" tab.
- Click "+ Create Book" and choose "Compilation Book".
- Select the books that you want to include in the compilation book. Only books from the class that you're currently in will be shown.
- Click "Create Compilation Book".
- After the editor opens, you can remove, edit, or move any pages in the compilation book. If you add/remove pages, make sure that pages that are intended to be on the left/right side of the page spread remain on the left/right side.
After you have some experience creating a StoryJumper book, you can add your classes as shown in the next section.
Step 3: Add Your Classes
It's important to create StoryJumper classes so you can read and manage your students' books and students can securely log into their own accounts.
To add your classes:
- Click "Home" at the top
- Scroll down to "My Classes" (see below)

Using Google Classroom
Not using Google Classroom
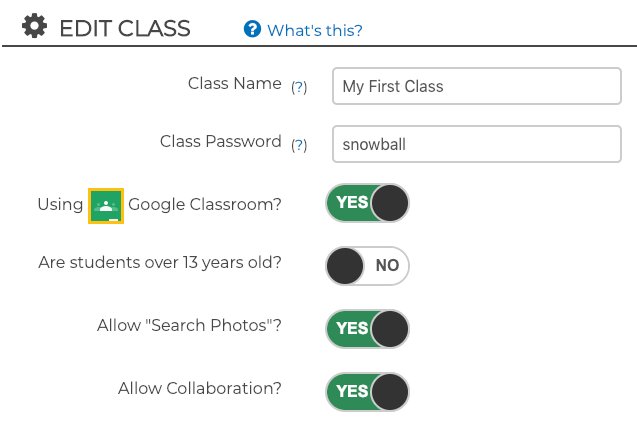
- Class Name.
- Class Password (temporary) that students will use to access this class the first time.
- Are you using Google Classroom? If so, click "Yes" so you can post assignments and students can turn in their StoryJumper books to Google Classroom.
- Are your students over 13 years old? If so, click "Yes" so your students can easily own their accounts. Each student's email address must also be included in the "Add Students" table.
- Do you want to allow students to search photos from Pixabay.com? If so, choose "Yes".
- Do you want to allow your students to collaborate on their books? If so, choose "Yes".
Step 4: Add Students & Teachers
Add Students
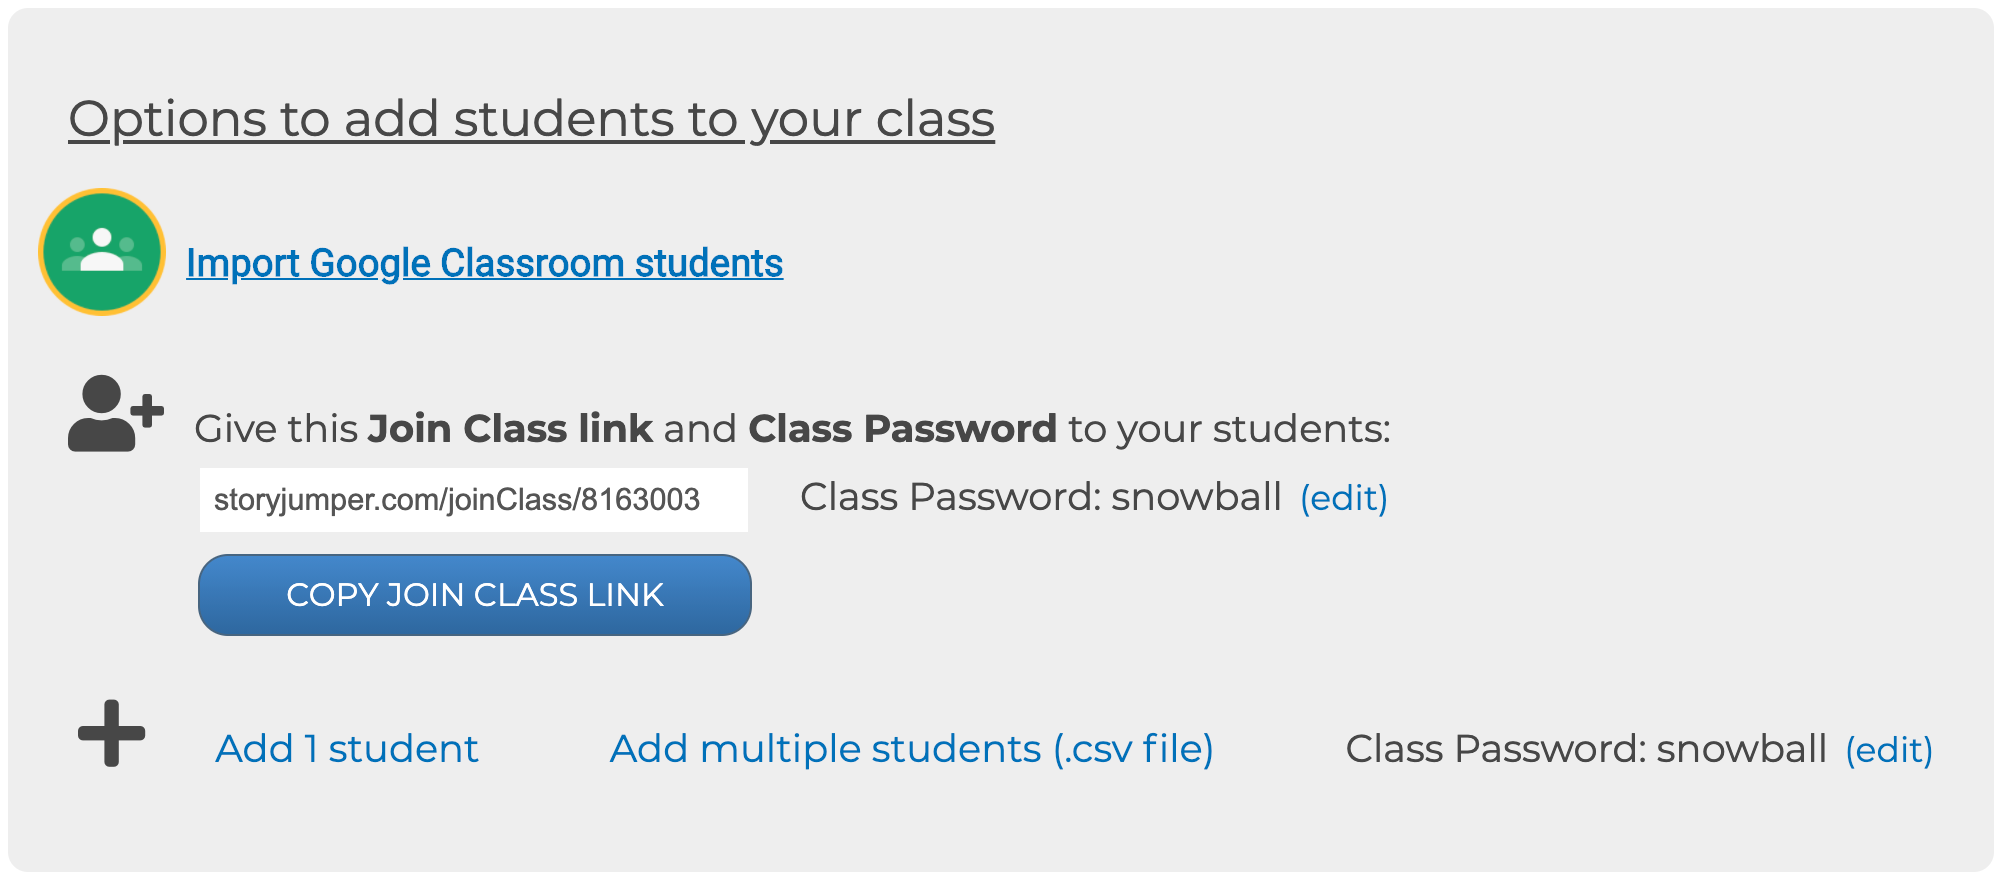
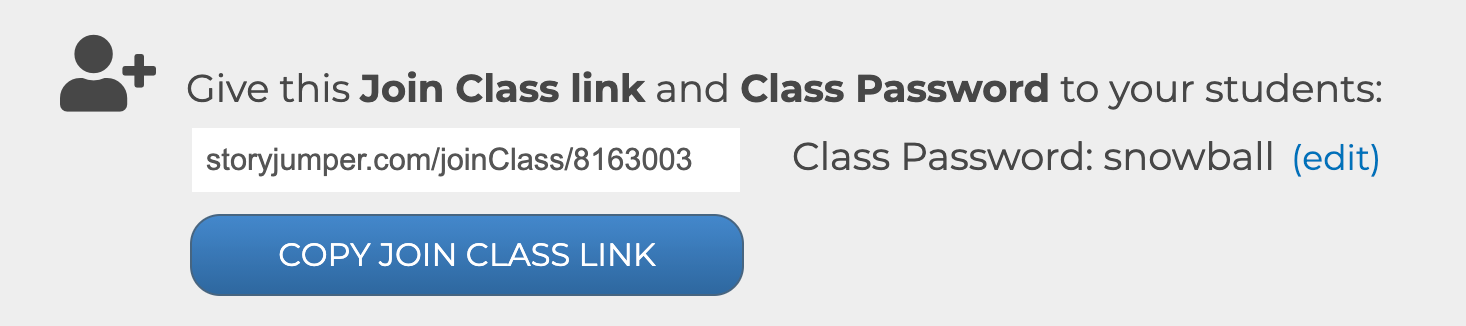
- Give them the "Join Class" link and the Class Password.
- Students should go to the "Join Class" link and enter the Class Password
- We'll ask them if they already have a StoryJumper account.
- If they click "No", they can create a new account.
- If they click "Yes", they can log into their existing account.
- After they join your class, they will appear on your "People" tab.
Add Teachers

Step 5: Students Log in
Option 1: You've Already Set Up Student Accounts
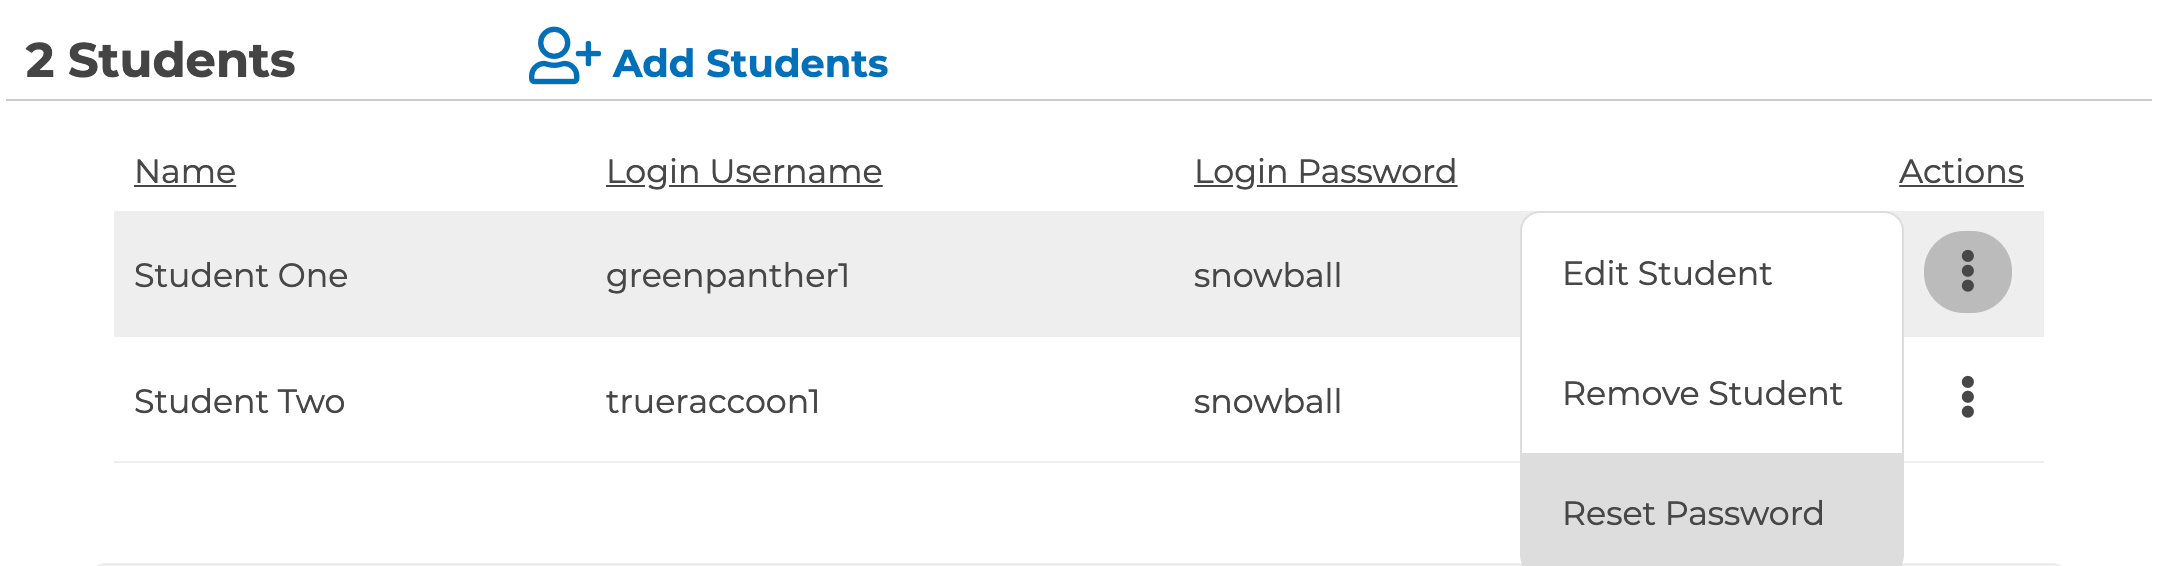
If you've already set up accounts for your students and their names appear in the "People" tab for your class (see above), then:
- Give your students their log in info shown in the "People" tab for your class.
In the example class above, "Student One" would log in with username "greenpanther1" and password "snowball".
- Tell students to go to storyjumper.com and click "Log in".
- Tell them to log in with the info that you gave them.
- They'll pick their own secret password that they'll use to log in from now on.
- If a student forgets their secret password, you can to reset it by clicking on the icon at the end of the student's row and click "Reset Password" (see above).
Option 2: You Haven't Set Up Student Accounts
If you haven't set up accounts for your students and you want them to join your class instead (see above):
- Give them the "Join Class" link and the Class Password shown in the "People" tab for your class.
- Students should go to the "Join Class" link and enter the Class Password
- We'll ask them if they already have a StoryJumper account.
- If they click "No", they can create a new account.
- If they click "Yes", they can log into their existing account.
- After they join your class, they'll appear in your "People" tab for your class..
Log in with Google (school email)
Students can also log in with their school email, provided by Google. They just click the "Log in with Google" button and click on their school email.
If students get an "Access Blocked" message, then follow these instructions.
Students can use StoryJumper at school or home
With our latest Terms of Service for Educational Accounts, students of any age can work on their StoryJumper books at home without needing a permission slip. However, if they have an "Educational Account" (the default) they won't own their accounts. Your school will own their accounts.
Therefore, students will be given the opportunity to "Transition to an Independent Account" so they can gain the following benefits:
- Own and control the content in the books they create
- Get email help from StoryJumper that's not blocked by school email filters
- Share their books publicly
- Create personal books
Step 6: Students Create Books
After your students log in, they should click the + Create new book link to start their own book. Then have them watch the introduction video to learn the basics.
If you've taken photos with your phone for students to include in their books, then upload the photos to a shared folder on Dropbox, Google Drive, or other service. Then your students can access the photos when they click "Photos" and then "Upload your photos" on the left side.
If your students are illustrating their book and they don't find what they're looking for in our art library, they can create their own AI Pictures (click here for instructions).
Students can also narrate their books to practice their reading fluency and pronunciation.... or just to have fun! Adding their voices and special effects adds a personal touch to their creation. Here's how to narrate your book:

Step 7: Review Student Books
While your students are working on their books, you can go to your class page and scroll down to the Review Student Books section to see all of your students' books. You can click on the student books to read, edit, and comment on them.
Before your students turn in their assignment, you can turn on access to the Clean Up tool so they can self-correct their spelling / grammar mistakes in their books. The tool's report also provides explanations for the corrections so your students can learn why the correction is needed (see example report here).
Before students turn in their assignment, you can also ask them to peer review each other’s books. A student can click Collaborate in the editor to invite another student in their class to collaborate on their book. The invited student will see the author’s book on their home page and can make edits and comments on the book. After the review is completed, the original author can remove the collaborator from their book.
When a student is finished, they can click the FINISHED button below their book on their home page.
Then you'll see the Finished label under their book on your "Books" tab.
If you've indicated that you're using Google Classroom, then your students can turn in their StoryJumper book to Google Classroom. They can click on the "Share to Classroom" icon below their book on their home page and then follow the typical steps to turn in a Google Classroom assignment.

Step 8: Share Books with Parents
Student books are "private" by default. But students want to be able to showcase their work to others and receive positive feedback. By sharing student books, you can securely allow parents and classmates to see the books, as well.
There are the 3 methods to share your students' books with parents:
1. Copy the "Share Link"
The easiest method to share students books is to give others the "Share Link".
Here's how:
- Click "Home"
- Click on your class
- Click Share Books with Parents. This will add all of the books in that class to a Shared Library. You can remove a book from a Shared Library by hovering over it and clicking "X". Students in your class can now see the Shared Library on their StoryJumper home page when they're logged in.

- Click the COPY SHARE LINK button and paste the link into an email to parents or into the website/app that you use to communicate with parents. When a parent clicks on the Share Link, they will see all the shared books. They can click on their child's book, read it, and order a copy, which will be delivered directly to their home. You don't need to collect any money.
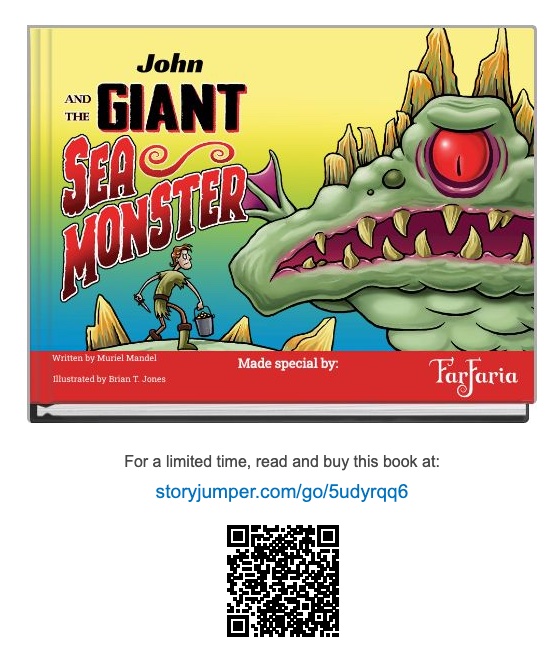
2. Print QR Codes
You can also print QR Codes for your students' books!
Post them on the walls inside / outside your class so other students can read your students' books and get inspired to write!
Check out this example:
Here's how:
- Click on your class
- Click on your student's book
- Click Share
- Click Print QR Code
3. Print Private Handouts
Finally, you can privately share a student's book if you only want a parent to see their own child's book. Note that students will see each other's books on their Home page.
Here's how:
- Click "Home"
- Click on your class
- Click Share Books with Parents and Students
- Click Print Private Handouts. You can give each student their private handout to take home to their parent. When a parent goes to the link in the handout, they will only see their child's book. They can read it and order a copy, which will be delivered directly to their home. You don't need to collect any money.
Step 9: Buy Student Books
You can buy copies of your student books in different styles:
- Hardcover Book
- Paperback Book
- Download Video Book
- Download PDF eBook
To order:
- From your class page, scroll down to Buy Student Books.
- Pick which book type you want and click the ADD TO CART button to add all the books in your class to your cart. Alternatively, you can go to each student book individually, click the BUY button, and add it to your cart.
- Remove any unneeded books from your cart and click CONTINUE. If you order more than 15 hardcover / paperback books, you automatically get a 10% discount.
- Enter your shipping information.
- Pick your payment option: Purchase Order, credit / debit card, Paypal, or Amazon Pay.
- Submit your order.
After you submit your order, we'll send you a digital proof of each book for you to review. If any changes are needed, edit the book and we'll generate a new digital proof for you to review. When all the digital proofs look good to you, approve them, and we'll start publishing your books!
On your order confirmation page, you'll see a "Target Delivery Time" so you'll know when to expect your books. We'll email you when your books ship out.
More Resources
For more details for authors, check out the Author's Guide on creating books.
Contact StoryJumper
We love to hear from teachers. For any questions or comments, please contact us.